
High availability TAP configurations use redundant TAPs, bypass TAPs, and packet brokers to keep monitoring and inline security tools receiving traffic during link, device, or tool failures. Many teams protect servers and firewalls first, but the visibility layer often gets overlooked until an outage happens.
We have seen one failed cable cut off an entire monitoring stack without warning. A TAP copies traffic, a bypass TAP prevents inline tools from causing downtime, and a packet broker sends traffic where it is needed most. Together, they help networks stay visible under pressure. Keep reading for practical design guidance.
Why High Availability TAP Configurations Matter Fast
High availability TAP configurations keep visibility online by removing weak links before failures happen. This quick summary highlights the core ideas you need before building or upgrading your design.
- High availability tap configuration removes single points of failure from the monitoring path through redundancy, failover logic, and tested recovery workflows.
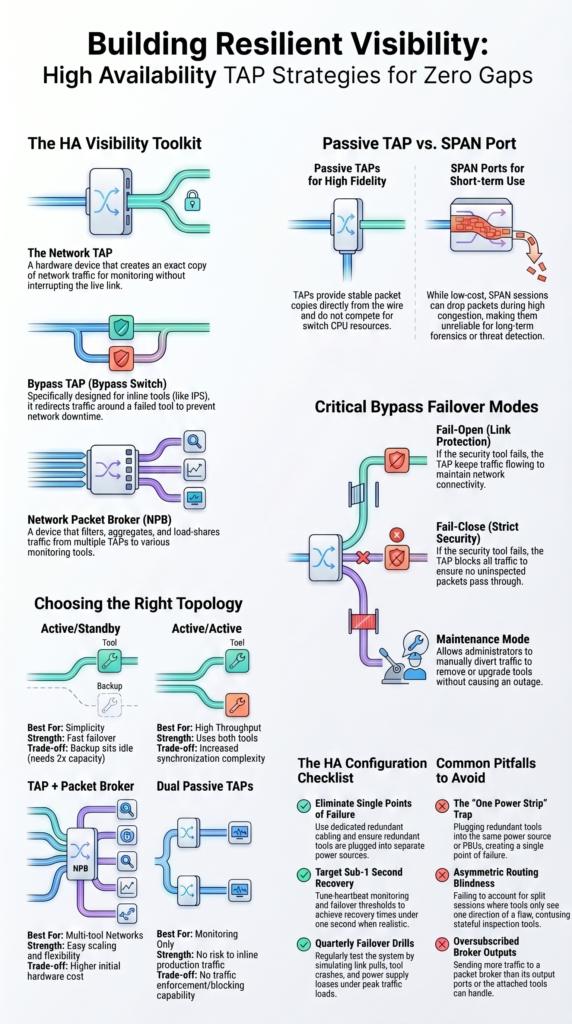
- Passive TAPs suit monitoring, while bypass tap high availability designs protect inline tools such as IDS, IPS, and firewalls.
- We often place Network Threat Detection first in the tool chain because resilient visibility is most useful when threat analytics remain online.
What Is a High Availability TAP Configuration?

A high availability TAP configuration is a network design that keeps traffic visibility or inline inspection working when one TAP, link, or appliance fails. In simple terms, if one part breaks, monitoring should not disappear.
Many companies protect production traffic well, yet the tools watching that traffic still depend on one weak link. We have seen maintenance windows where routing stayed healthy, but security feeds went dark for hours. That gap is common and risky.
Even when a switch stack from Cisco stays online, a single SPAN session can fail or lose packets. That is why many teams move to dedicated TAP designs. If the uptime target is 99.99%, the visibility layer should match it.
Most HA builds use these parts:
- TAP devices for packet access
- Bypass switches for inline tools
- Packet brokers for filtering and load sharing
- Redundant IDS, capture, or analytics tools
- Clear failover runbooks
When we assess environments, we treat visibility as a core service. Our risk analysis tools often flag hidden dependencies that teams missed. Once those are fixed, resilience improves quickly.
Which HA TAP Topologies Work Best?
The best topology depends on what the network needs most: simple failover, more throughput, or traffic delivery to many tools. There is no single layout that fits every site.
Some teams want the easiest design to manage. Others need several tools inspecting multiple links at once. We have also seen companies buy oversized systems they never use, while smaller shops outgrow basic setups too soon. In fiber-heavy environments, choosing the right fiber optic network taps types can shape both uptime and scaling plans.
| Topology | Best For | Strength | Trade-off |
| Active/Standby | Simplicity | Fast failover | Backup sits idle |
| Active/Active | High throughput | Uses both tools | More sync work |
| TAP + Packet Broker | Multi-tool networks | Easy scaling | Higher cost |
| Dual Passive TAPs | Monitoring only | No inline risk | No enforcement |
Standby models often need close to 2x capacity because one appliance waits in reserve. That can still be the right call when uptime matters more than efficiency.
Vendors such as Gigamon helped popularize visibility fabrics, but the idea matters more than the logo. We usually advise choosing the smallest design that supports the next 24 months of growth.
How Do Bypass TAPs Prevent Outages?
Bypass TAPs keep production traffic moving when an inline security tool fails. That is their main job, and it is an important one.
The TAP sits between two network devices. During normal operation, traffic flows through the firewall, IDS, or IPS. If that tool crashes or stops responding, the TAP redirects traffic around it so the link stays up.
Health checks usually control the switch. If responses stop for a set timer, failover begins. Depending on hardware and speed, that can happen in microseconds or milliseconds.
Common modes include:
- Fail-open keeps traffic flowing if the tool fails
- Fail-close blocks traffic when policy requires strict control
- Maintenance mode removes tools during upgrades
- Manual failover supports planned changes
Other platforms may have their own HA logic, but the TAP adds another layer of protection outside the appliance itself. We always prefer testing under real load, not in an idle lab. Live traffic exposes timing issues, routing oddities, and tool limits. Our threat models also help decide when fail-open is safer than fail-close.
Passive TAP vs SPAN Port for High Availability
Passive TAPs are usually the stronger long-term choice because they provide stable packet copies without relying on switch resources. SPAN ports still have value, but often as a temporary tool.
We use SPAN sessions during troubleshooting when speed matters. They are quick to enable and cost little upfront. Still, long-term monitoring can suffer when mirrored traffic competes with production switching tasks. Many teams compare network Taps vs. SPAN/mirror ports when deciding how to improve visibility resilience.
Under congestion, SPAN sessions may drop packets or miss bursts. That weakens investigations and makes alerts harder to trust. Passive TAPs avoid much of that problem because they copy traffic directly.
| Factor | Passive TAP | SPAN Port |
| Packet Fidelity | High | May drop under load |
| Latency Impact | Minimal | Depends on switch |
| HA Reliability | Strong | Lower |
| Cost | Hardware cost | Lower upfront |
Guidance from vendors such as Juniper Networks often notes mirror-session limits by platform. Those limits matter more as traffic grows.
If compliance capture, packet forensics, or Network Threat Detection is important, passive TAPs usually give better results. We recommend SPAN for short-term needs, TAPs for serious visibility.
How Should You Configure HA TAP Failover?
Credits: Technically U
Good HA failover depends on clean physical design, sensible timers, and repeatable testing. Fancy diagrams do not help if cabling is poor.
We have reviewed many environments where the logical design looked strong, yet one shared switch or mislabeled cable could break everything. Hidden dependencies are common, which is why our risk analysis work starts with the physical path.
As highlighted by Gigamon
“Active TAPs can boost signals over long distances, and while they require electricity, many now include failsafe features like battery backup… Ensuring critical links have extra power margin lowers risk, an expense that can usually be justified.” – Gigamon Blog
Use direct links between TAPs and tools when possible. Shared access layers create extra failure points.
Recommended steps:
- Use dedicated redundant cabling
- Enable heartbeat monitoring
- Start with conservative failover timers
- Tune thresholds after traffic tests
- Log every failover event
- Send alerts to the SIEM
- Aim for recovery under 1 second when realistic
Every design should be tested with:
- Link pull
- Tool crash
- Reboot cycle
- Peak traffic load
- Power supply loss
Security platforms benefit when the visibility layer fails over cleanly. We always document rollback steps before changes. During an outage, clear notes save time and reduce mistakes.
What Are the Main Benefits and Trade-Offs?
HA TAPs improve uptime, visibility, and maintenance flexibility, but they also add cost and design work. Both sides should be understood before deployment.
The biggest gain is continuous monitoring. Security teams can still inspect traffic during upgrades, software failures, or cable faults. That reduces blind spots and shortens incident response time.
Insights from Nobl9 indicate
“Each additional ‘nine’ of uptime requires increasingly elaborate redundancy strategies: multi-region failover, real-time replication… These layers increase the surface area for bugs and can create new avenues for failure, ironically undermining the goal of high availability. Instead, focus on designing for graceful degradation.” – Nobl9 Blog
Another benefit is smoother maintenance. Tools can be patched or replaced with less pressure because traffic paths stay available.
Common benefits:
- Continuous visibility
- Safer upgrades
- Fewer monitoring gaps
- Better compliance capture
- Stronger Network Threat Detection continuity
Trade-offs are real too:
- More ports
- More cabling
- Added spend
- More testing cycles
- Tighter change control
Vendors often focus on appliance resilience, which matters. Still, resilient traffic feeds matter just as much. A strong firewall cannot inspect packets it never receives.
We usually tell teams to compare outage cost against design cost. In many cases, even one avoided incident can justify the added hardware and planning.
Common Mistakes to Avoid in HA TAP Designs

Most HA failures come from weak testing, hidden single points of failure, or tool capacity mismatches. The design may look redundant on paper and still fail in practice.
We often find dual TAPs feeding one overloaded analyzer. That creates one bottleneck capable of taking down visibility for everyone. Another common issue is power design. Two tools plugged into one strip is not real redundancy.
Routing problems also get ignored. Asymmetric traffic can split sessions and confuse tools that expect both directions of a flow. In mixed environments, weak visibility planning across on-prem and cloud networks can create similar blind spots. Which is why many teams review virtual network taps vTaps cloud strategies as part of HA design.
Common pitfalls include:
- One power source for both tools
- Shared switch in the tool path
- Ignoring asymmetric routing
- Oversubscribed packet broker outputs
- No rollback plan
- No quarterly failover drill
Tools like Wireshark remain useful for checking packet symmetry, retransmissions, and failover timing during tests.
Our threat assessments often show that process failures cause as many outages as hardware failures. No owner, stale diagrams, and missing change notes can undo a solid design. Smart architecture still needs disciplined operations.
FAQ
What is the best high availability tap configuration for small networks?
The best high availability tap configuration for small networks often uses network tap redundancy with two redundant tap links. This setup keeps monitoring traffic available if one path fails. Many teams start with passive tap HA because it adds little complexity. Use clear labels, clean cabling, and regular failover tests to keep the design reliable over time.
When should teams choose bypass tap high availability designs?
Teams should choose to bypass tap high availability when security tools sit inline and downtime is not acceptable. A failover bypass TAP or tap fail-open mode keeps production traffic moving if a tool loses power or stops responding. This supports inline tap failover plans. Test the setup during maintenance windows to confirm it works as expected.
How do high availability monitoring taps improve visibility?
High availability monitoring taps help tools keep receiving packets during link, device, or path failures. They support network visibility HA by reducing blind spots during outages. Many teams pair redundant monitoring taps with tap aggregation for HA so analyzers still receive traffic from key links. This improves high availability packet capture during busy traffic periods.
What common HA tap configuration mistakes should teams avoid?
Common HA tap configuration mistakes include using one power source, poor HA tap cabling, missing labels, and skipping tests. Some teams ignore HA tap latency or skip HA tap benchmarking before deployment. Others forget HA tap configuration validation after making changes. Use an HA tap configuration checklist to catch problems before they cause outages.
How often should teams test an HA tap deployment?
Teams should test an HA tap deployment after installation, after major network changes, and on a regular schedule. Review HA tap failover scenarios such as power loss, cable pulls, and tool outages. Validate HA IDS tap configuration or HA IPS tap design responses during each test. Regular HA tap testing helps prevent unexpected failures later.
Reliable Visibility Needs Real Redundancy
You feel the risk when monitoring fails during an outage, tools go dark, alerts stop, and your team loses sight of what is happening. That pressure builds fast.
That’s why strong teams place NetworkThreatDetection.com early in the chain and treat visibility like core infrastructure. If you want fewer blind spots and faster response during failover events, start here and build resilience you can trust.
References
- https://blog.gigamon.com/2019/03/26/understanding-network-taps-part-3-eight-best-practices/
- https://www.nobl9.com/service-availability/high-availability-design