Copper network tap considerations start with one simple rule: plan carefully before touching a live link. Installing a tap takes timing and attention, because even a small physical mistake can cause bigger issues upstream. We’ve worked in environments where everything went smoothly, and others where rushed changes led to unstable links and confusing alerts.
The difference is almost always preparation. From our side, taps are critical for security since they provide clean traffic for threat models and analysis. This guide walks through what actually happens in real deployments. Keep reading to avoid common mistakes and get it right the first time.
Quick Wins for Copper Network Tap Installation
If you get these basics right, most installation issues never happen in the first place.
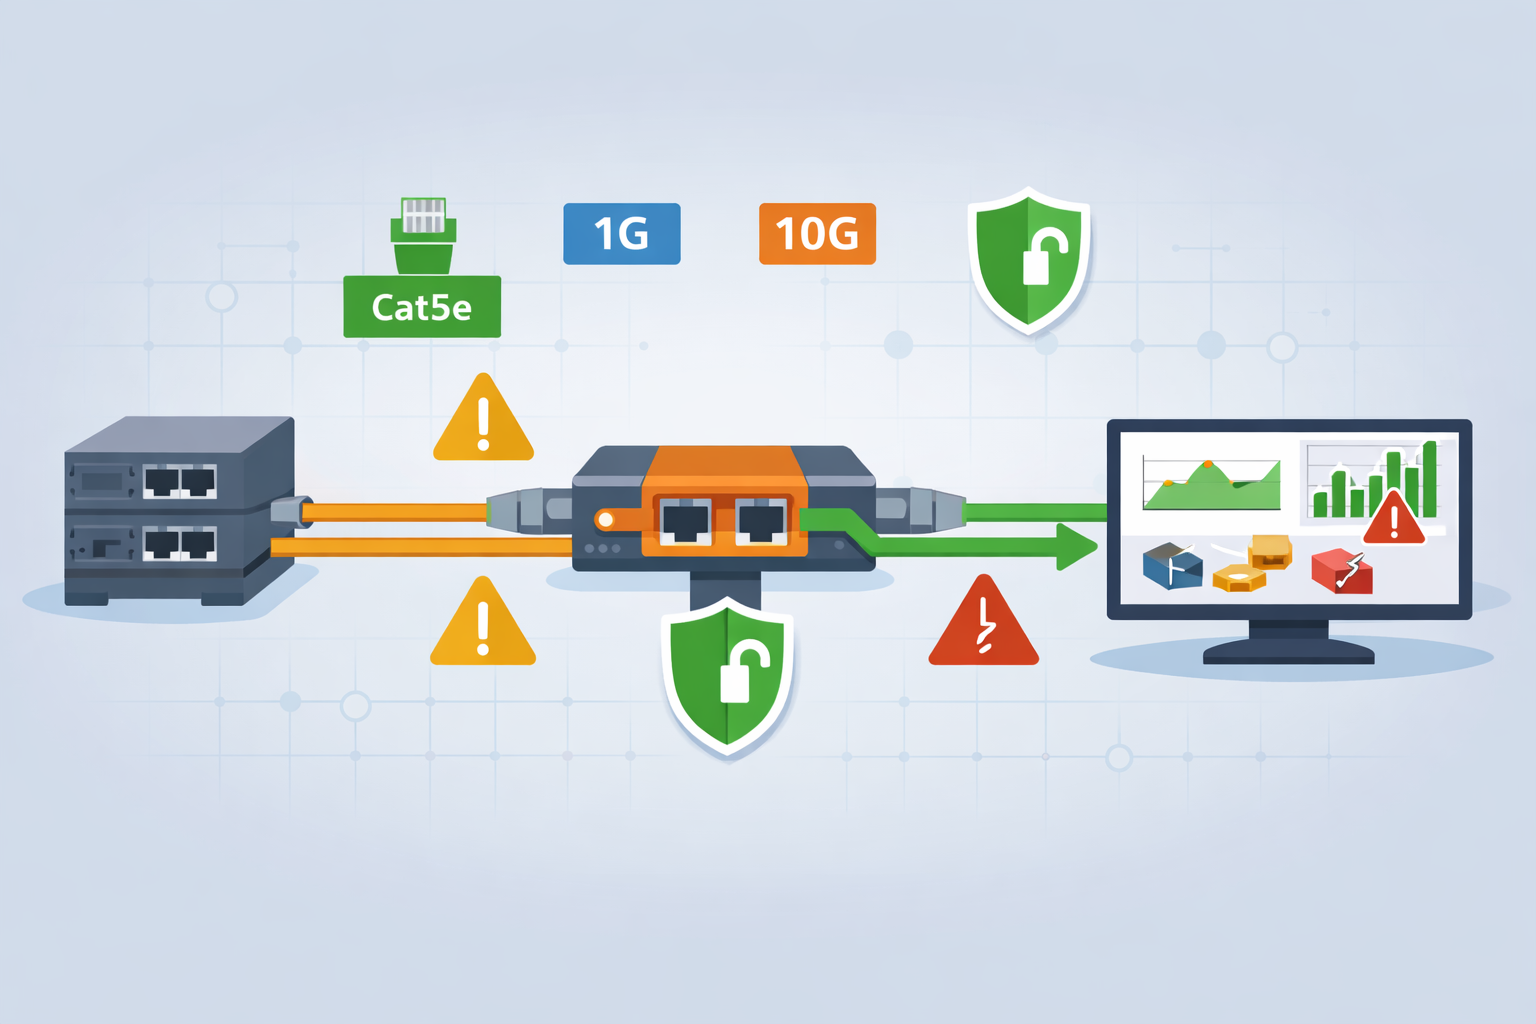
- Matching link speed, duplex, and cable category determines whether your copper tap installation succeeds or fails.
- A fail-open tap with relay-based bypass protects uptime during power loss and avoids SPOF risk.
- Proper monitor port sizing prevents silent packet loss, especially in NDR tap and IDS deployment scenarios.
These are simple steps, but they reflect what we see across real deployments. When done right, they prevent the majority of issues before they start.
What is a copper network tap and how does it work?
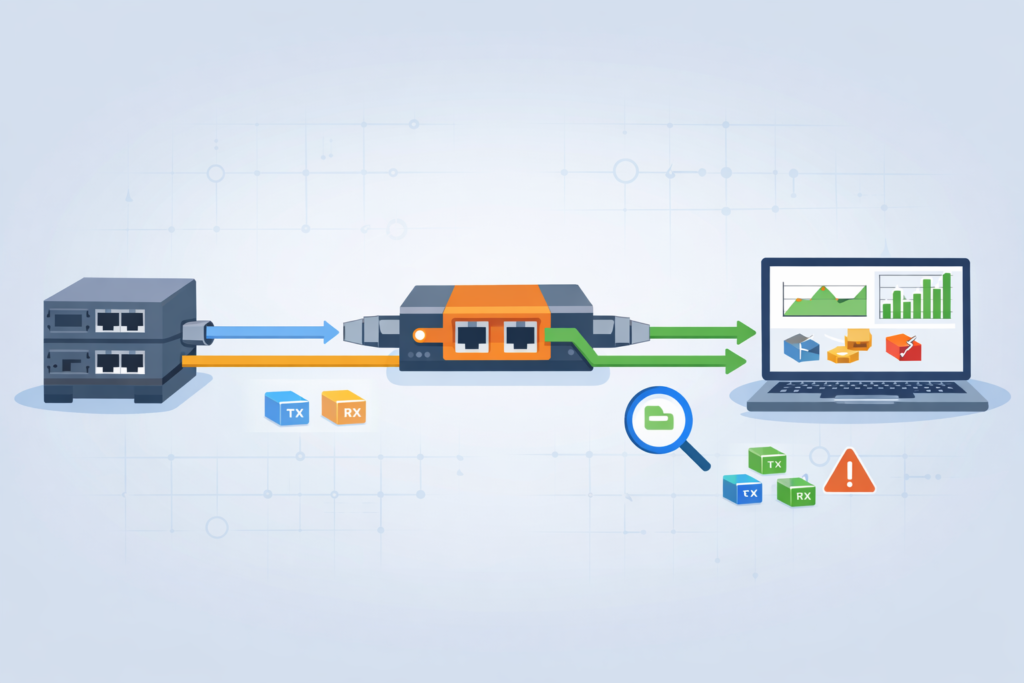
A copper network tap sits in line between two devices and copies traffic without interfering with it. We rely on taps because they give us raw, unfiltered data, not what a switch decides to forward. This becomes clearer when looking at broader network tap deployment advantages for visibility, especially in high-risk environments.
At the physical level, these taps split traffic into two streams:
- One path continues normal communication
- The other sends a copy to monitoring tools
Because both transmit and receive directions are captured, we always see the full conversation. That matters during investigations. In several incidents we handled, mirrored traffic missed corrupted packets that the tap captured clearly.
Teams often underestimate how much detail exists in those errors. CRC issues, malformed frames, and retransmissions can explain behavior that logs alone cannot.
We use taps to feed tools like packet analyzers and detection systems. This allows us to build accurate threat models instead of guessing from partial data.
From experience, the difference is clear. When taps are in place, analysis becomes faster and more confident. Without them, teams spend more time questioning the data than acting on it.
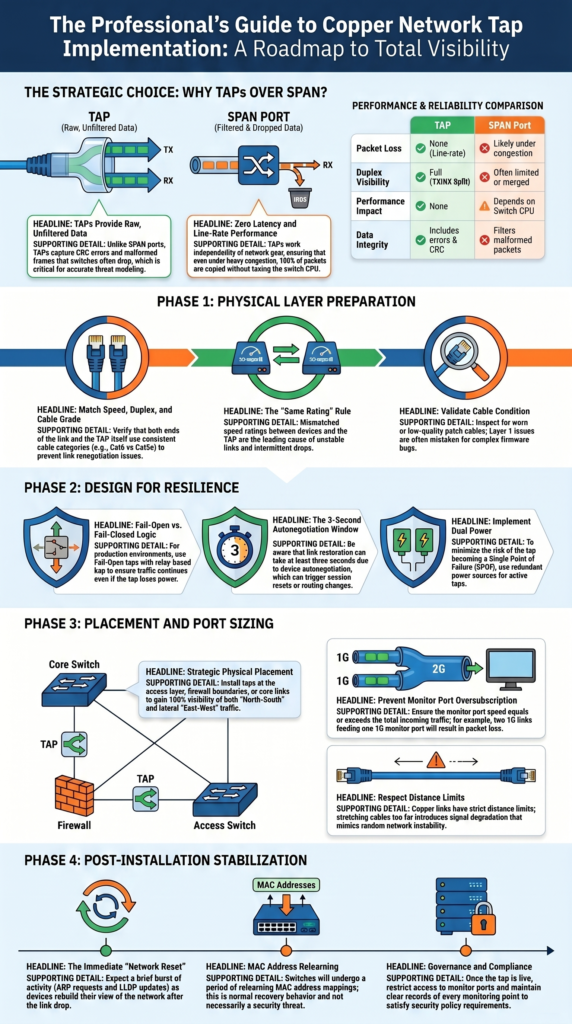
TAP vs SPAN port: when is a tap actually worth it?
A copper ethernet tap is worth using when you need complete visibility and accuracy. SPAN ports often choke under heavy load because they depend on the switch’s CPU and buffers.
A copper ethernet tap is worth using when you need complete visibility and accuracy. SPAN ports often choke under heavy load because they depend on the switch’s CPU and buffers. A deeper comparison of network TAPs vs SPAN/mirror ports shows how quickly mirrored traffic can become unreliable under pressure.
Taps, on the other hand, work independently from your network gear. That’s why we put them in early for Network Threat Detection pipelines.
| Feature | TAP | SPAN Port |
| Packet Loss | None (line-rate) | Likely under congestion |
| Duplex Visibility | Full (TX/RX split) | Often limited or merged |
| Performance Impact | None | Depends on switch CPU |
| Data Integrity | Includes errors & CRC frames | Filters malformed packets |
The trade-off is clearer in a real network:
- SPAN is fine for low-risk, casual monitoring.
- A TAP is required for forensic capture and IDS deployments.
- A TAP gives you latency-free copying.
For teams that need to see east-west and north-south traffic clearly, the choice usually leans toward a tap.
How do you match network speed and cable type correctly?
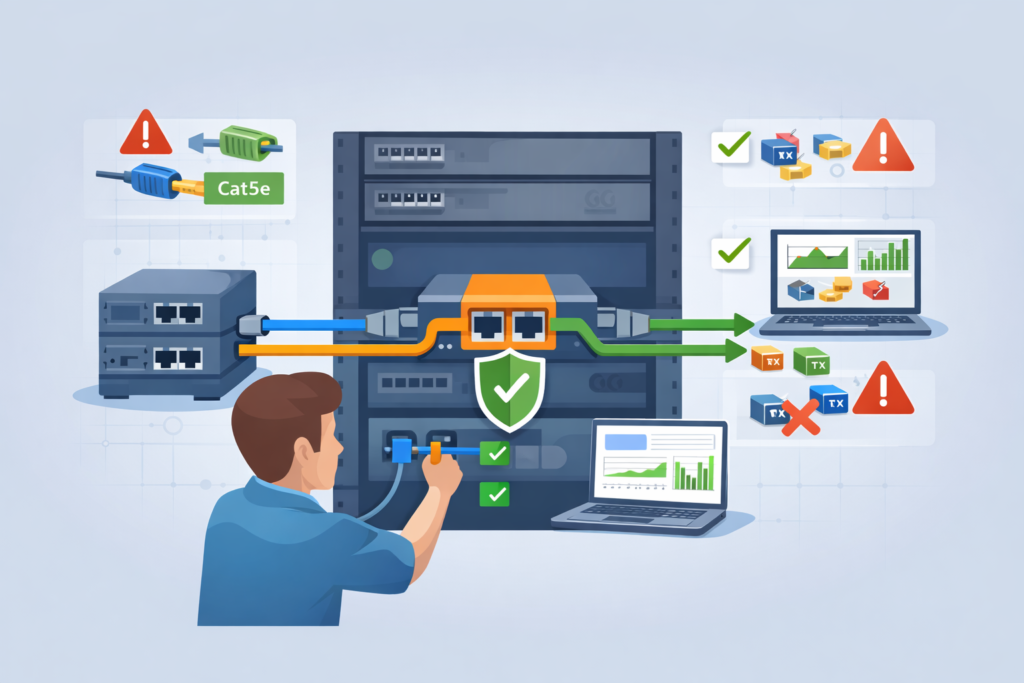
Matching speed and cable type sounds basic, yet it causes a surprising number of failures. We have stepped into environments where links were unstable for weeks, only to find a mismatch in cable categories.
Copper Ethernet has strict limits. If one side uses a lower-grade cable, the entire link can degrade. The symptoms often appear as intermittent drops or renegotiation issues.
In our deployments, we follow a simple validation approach:
- Confirm both ends use the same speed rating
- Check full-duplex compatibility
- Verify consistent cable category across the link
- Inspect cable condition, not just type
One case stood out. A team mixed Cat5e and Cat6 on a critical link. The network worked most of the time, but failed under load. Replacing the cable fixed everything instantly.
We treat this step as part of a broader infrastructure audit. It is not about the tap alone, it is about the entire physical path.
Getting this right upfront saves hours of troubleshooting later. Most “tap issues” we encounter trace back to cabling, not the device itself.
Why fail-safe behavior determines whether you create a SPOF
Fail-safe behavior decides whether a tap protects uptime or introduces risk. We have seen both outcomes, sometimes in the same data center.
A fail-open tap allows traffic to pass even if the device loses power. A fail-closed tap stops traffic entirely. That difference matters during outages.
In real environments, even short interruptions can trigger wider issues:
- Session resets across firewalls
- Routing instability
- Application timeouts
We once reviewed an incident where a power fluctuation caused a tap to fail closed. The result was a full service disruption that lasted minutes. The hardware worked as designed, but the design choice was wrong.
When we design monitoring points, we focus on resilience:
- Choose fail-open designs for production links
- Test bypass behavior before deployment
- Consider dual power where possible
These decisions sit at the intersection of networking and risk management. From our perspective, a tap should never become the weakest link in the chain.
Where should you physically place the copper tap?
Credits: Garland Technology
Placement affects both signal quality and operational clarity. We usually install taps as close as possible to the devices we want to observe. That reduces cable complexity and avoids unnecessary extensions.
As noted by Garland Technology
“Using Network TAPs in the physical layer, often called the access layer, will provide 100% visibility for your out-of-band monitoring tools like Wireshark, network analyzers, DPIs, and lawful intercept applications. […] By placing TAPs strategically throughout the physical layer, you can compare traffic to the baseline to not only help spot suspicious activity but ensure your monitoring tools are deployed properly.” – Garland Technology Blog
Copper links have distance limits. Stretching beyond those limits introduces signal degradation that can look like random instability.
In practice, placement follows a few common patterns:
- Near switches or top-of-rack devices
- At firewall boundaries
- Along core or distribution links
We adjust placement based on what needs visibility. For threat analysis, internal traffic often matters as much as perimeter traffic. Ignoring lateral movement leaves blind spots.
In one deployment, moving a tap just a few meters closer to the switch resolved recurring link issues. The original placement pushed the cable length too far. We treat placement as both a technical and analytical decision.
How do you prevent packet loss on monitor ports?
Packet loss on monitor ports is one of the most common hidden problems. Everything appears normal, yet data is missing. We have encountered this in several environments where multiple links fed into a single port.
The issue is simple: combined traffic exceeds the monitor port capacity.
To avoid this, we plan capacity carefully:
- Match monitor port speed to total incoming traffic
- Avoid aggregating multiple high-traffic links into one port
- Scale up to higher-speed ports when needed
A common mistake looks like this:
- Two 1G links feeding one 1G monitor port
- Result: dropped packets during peak usage
We have seen teams blame analysis tools when the real problem was upstream. Once the monitor capacity was increased, visibility improved immediately.
From our perspective, this is a risk control issue. Missing packets lead to incomplete analysis, which leads to incorrect conclusions.
We design monitoring paths with headroom, not just current usage. Traffic grows, and visibility should not degrade when it does.
What actually breaks in real installations? (field lessons)
Most failures come from simple physical issues, not complex configurations. We have walked into situations where teams suspected firmware bugs, only to find damaged cables.
Insights from Wikipedia indicate
“Putting a network tap into place will disrupt the network being monitored for a short time. […] In the case of a failure, the link can go down and the services on the link are interrupted. To minimize this problem, each copper tap has a bypass switch (relays), which closes in a power-down situation […] Also, this solution will not detect that the link is down for a minimum of three seconds. These three seconds are a result of the autonegotiation behavior […] Even this short interruption time could cause big problems in a network.” – Wikipedia
Common problems show up repeatedly:
- Worn or low-quality patch cables
- Mixed cable categories
- Incorrect aggregation design
- Power instability in active taps
These patterns repeat across environments. Layer 1 issues are often overlooked because they seem too basic. Yet they cause some of the most disruptive problems.
We approach troubleshooting with that in mind. Start with the physical layer, then move upward. Experience has taught us that reliable monitoring depends on simple things done right.
How do you install a copper tap without causing downtime?
Installing a copper tap without disruption takes planning, and even then, a brief interruption is usually unavoidable. The goal isn’t zero impact, it’s controlled impact.
In practice, we treat every install as a small operation with clear steps:
- Validate cables and link conditions ahead of time
- Confirm fail-safe behavior before going live
- Schedule a proper maintenance window
- Prepare a rollback plan in case something breaks
When the tap is inserted, the link will drop for a moment. That’s expected. What matters is that everyone is ready for it.
We learned this the hard way. In one case, the technical setup was solid, but the work happened outside a maintenance window. The result was avoidable service disruption. Since then, we assume every change carries risk, even small ones.
From a security angle, we also use our own threat models and risk analysis tools to plan installs more carefully. It helps us see what could go wrong before it does.
Afterward, we don’t just check if the link is back, we verify visibility too. If monitoring data isn’t right, the job isn’t finished.
How do devices react after tap installation (ARP, MAC, LLDP)?
Once a tap is installed, devices don’t stay quiet, they react. The link reset forces them to adjust, and that can look noisy if you’re not expecting it.
Right after insertion, we usually see a short burst of activity:
- MAC address relearning across switches
- ARP requests to rebuild IP-to-MAC mappings
- LLDP updates as devices reannounce themselves
This happens because the network briefly “forgets” parts of itself when the link drops. Devices then rebuild their view, step by step.
In our experience, most networks settle down within a few seconds. On larger or more complex setups, though, there can be brief routing changes or extra chatter before things stabilize.
We’ve also seen monitoring tools flag this as suspicious. Without context, it looks like unusual traffic. With context, it’s just normal recovery behavior.
That’s why we factor these patterns into our threat models and risk analysis. Not every spike is a threat. Some are expected side effects of change. When teams understand this, they avoid chasing false alarms and can focus on real issues instead.
What security and compliance factors must be considered?
Adding taps gives you more visibility, but it also brings more responsibility. When traffic is captured, it can include sensitive data, even encrypted sessions that still carry risk.
From what we’ve seen, the focus should stay on control and accountability:
- Limit who can access monitor ports
- Keep clear records of every monitoring point
- Define how captured data is stored, used, and protected
In many environments, this isn’t optional. Some teams we’ve worked with require formal approval before any tap is installed. Every change is documented, reviewed, and tied to policy.
Encryption makes things more complex. Capturing encrypted traffic is easy enough, but deciding how, or if, it should be inspected is a bigger question. That choice has to match legal rules and internal policies.
We treat taps as part of a larger security approach, not standalone tools. Our threat models and risk analysis help guide how data is handled after it’s captured.
In the end, visibility without governance can create new risks. The same data that helps defend the network can also become a liability if it’s not controlled carefully.
Copper network tap installation best practices for production networks
Reliable installs don’t come from quick fixes. They come from doing the same things right, every time. In our work, a clear and repeatable process has made the biggest difference.
Across deployments, we stick to a few core practices:
- Match speed, duplex, and cable type exactly
- Use fail-open designs on critical links
- Check monitor port capacity before turning anything on
- Avoid relying on SPAN where risk is high
These steps may seem simple, but skipping one can cause real issues. We’ve seen clean installs go wrong just because a small detail was missed.
It also helps to bring taps into security workflows early. Waiting until after an incident limits what you can see. We use our threat models and risk analysis tools upfront, so visibility is ready when it’s needed.
Even in networks moving toward fiber, copper taps still matter. Many environments run mixed infrastructure, and visibility can’t wait for full upgrades. In those cases, understanding different fiber optic network taps types helps teams plan ahead during transition.
From experience, fewer surprises come from consistent habits. It’s not about complex setups, the process itself is what keeps things stable.
FAQ
What issues can happen during copper tap installation on busy networks?
During copper tap installation, several issues can appear, especially in busy networks. We often see link bounce, cable category mismatch, and poor patch cable integrity. In some cases, incorrect cable length planning causes unstable links.
These physical layer tap problems can disrupt network reliability. A careful network tap deployment checks cables, connectors, and link conditions early to prevent repeated issues later.
How do you choose between passive copper tap and active copper tap?
Choosing between a passive copper tap and an active copper tap depends on your environment. A passive copper tap works well when you need a simple, latency-free tap with no power required.
An active copper tap offers more control but depends on power. We usually consider power loss resilience and fail-safe tap behavior before deciding what fits a production network tap best.
When should you use a fail-open tap instead of a fail-closed tap?
A fail-open tap is best when uptime is critical. In a production network tap setup, a fail-open tap with relay-based bypass allows traffic to continue during power loss. A fail-closed tap can stop traffic completely, which increases SPOF risk. We have seen outages caused by the wrong choice, so proper redundancy planning and fail-safe tap design are always important.
Why does monitor port oversubscription cause packet capture issues?
Monitor port oversubscription occurs when incoming traffic exceeds the port’s capacity. For example, two links feeding one 1G monitor port can cause packet loss during peak usage. This affects packet capture, IDS tap, and NDR tap performance.
We recommend proper monitor port sizing, such as using a 10G monitor port when needed, to maintain accurate network visibility.
How do you plan tap placement for better network visibility?
Tap placement depends on which traffic you need to monitor. We often place an inline copper tap near a switch tap, firewall tap, or core link tap. To improve network visibility, teams should monitor both east-west tap and north-south tap traffic. Proper tap placement supports early detection and reduces reliance on SPAN vs tap setups alone.
Get the Installation Right from the Start
You feel the impact when a tap install isn’t done right, signals get noisy, connections act up, and your data stops being reliable. It causes problems fast.
That’s why using a structured approach with Network Threat Detection makes it easier to stay in control and see real risk early. If you want clearer visibility you can trust, start here and build a setup that actually holds up under pressure.
References
- https://www.garlandtechnology.com/blog/3-places-to-tap-your-network
- https://en.wikipedia.org/wiki/Network_tap#Disadvantages_and_problems